|
Right from the industries to automotive repair and product assembly, construction work and machine maintenance utilize impact wrenches. These wrenches are identified everywhere. In the modern world, work must be done with ease reducing fatigue and saving time and money. Impact wrenches are the only answer, but not every wrench is the same. There are better cordless impact wrenches - you can check best ones at insidetool.com/impact-wrenches/best-of/the-best-cordless-impact-wrench/. Many types of impact wrenches are available in the market and the impact wrenches choosing can be done as per the requirement. Choosing cordless impact wrenches: There are different types of impact wrenches available in the market. The tools include pneumatic impact wrenches which are powered with compressed air. The corded impact wrenches work based on electricity. Battery power is used for cordless impact wrenches. Among all these impact wrenches cordless impact wrenches are more famous. They are available in different models and styles. High-quality cordless impact wrenches are available in the market today. The most popular impact wrench is the pistol grip, and it comes in the shape of L. As the impact wrenches are mainly designed to install and remove bolts and nuts. Many features must be taken into consideration while choosing impact wrenches. Torque: Torque is the primary feature that needs to consider. Whenever a fastener is to be removed the right amount of torque is essential. Impact wrench with higher torque might be more capable. The users have to check the torque as per the requirement, and minimum torque of 150ft-lbs is a must. Size: The size and torque are interlinked. Generally, small size always attracts users. The wrench with a smaller size will be used in a tighter space. There will be a drawback with the smaller size as required torque will not be generated. People must try to balance these two factors while choosing cordless impact wrenches. Weight: Weight might not be a constraint for small projects; however, while working on massive projects it is better to choose lighter weights. The users find it tiring to hold more large wrenches under fatigue. Impacts per minute: The calculation is done based on the hammer striking the anvil in a minute. The higher number enables the wrench to drive screws faster so that the bolts which are torqued more tightly can be loosened. Torque adjustments: Torque adjustments are crucial to avoid any significant damage and injuries. Generally, torque adjustments enable to control the output torque of the wrench. Due to the torque adjustments over torquing of bolts and snapping the bolts risks can be avoided. It is always essential to choose wrenches which are comfortable. The wrench must have balanced and comfortable grip to avoid the strain while using it. The impact wrenches with comfortable grip materials which are well-balanced help to reduce the fatigue as well. Apart from a relaxed grip drive size selection is also a must. ½ inch size is most commonly used. 3/8 will be the next option. 3/8 will have less torque compared to ½ inch drive wrench. Warranty: warranty is a must for impact wrenches. It entirely depends on the manufacturers. Some may offer one- or two-year warranty, and others may provide long term warranty. There are brands which even provide a lifetime warranty with a high-cost premium. The level of importance for all the above features must be given as per the type of use. 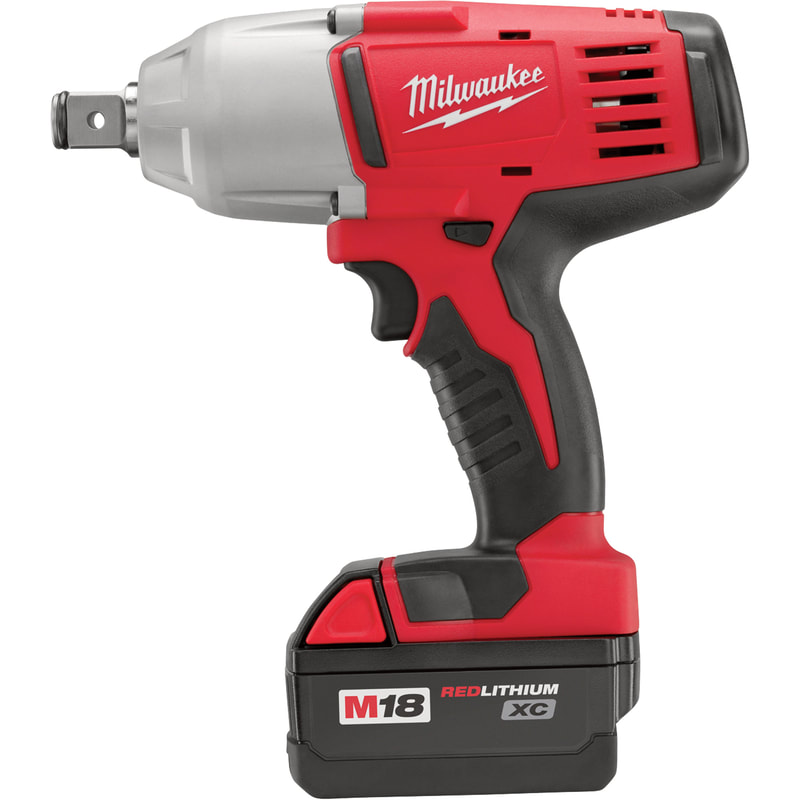
0 Comments
 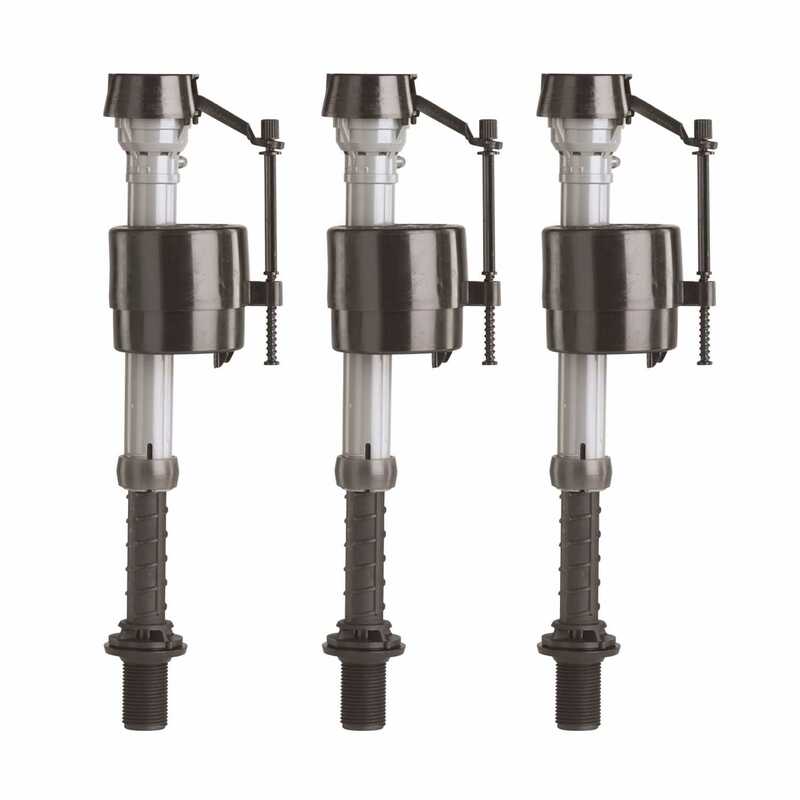 Most new toilet fixtures have the more modern flush valve assembly that is all plastic with only a few moving parts and only one little circular rubber part controlling the flow of water into your toilet tank. This part is called the fill valve seal, and most "Fluid Master" brand valves installed after 1975 will use the model 242 "replacement diaphragm" which is the heart of many flush valves on the market today.
If you look into the tank of your toilet you will see three main components, in the center, there is a rubber flapper with a cable or chain attached to it and a lever which connects the flapper to your flush handle. Next, you have the fill valve usually off to the left side of the tank. This valve had a large float that rises with the water as it fills your tank after you work the flush handle. When this float hits the top of the guide that it is riding on the water should stop flowing into the tank. Along the side of this float assembly there is an adjustable rod connecting this float to the lever arm where the rubber diaphragm is located. There is another version where the float lays horizontally across the tank, and a lever arm is connected to a tall shaft that has the diaphragm inside the top cap. These can be rebuilt as well, but you must make sure to find the correct model, so the new parts fit properly. So once you flush, and your tank starts to refill then eventually the float raises the push rod and when the lever arm is pressed upwards at the top of its stroke then the internal water pressure is directed to the top port inside this fill valve which forces the diaphragm to stop off the water flow into the tank. There is also a small tubing connected to the tall part of the flapper valve tube which directs some of the refill flow into the bowl instead of having it all go into the tank. If this tube is not attached to the tall tube above the flapper, then your bowl will not be filled to the proper level after each flush. What usually occurs with these fill valves is that the flow into the tank comes on at random times on its own, or it just never stops flowing. This usually means you need to replace the rubber diaphragm or the entire fill valve device. At any decent hardware department or store these diaphragms are around $3 and the entire valve is about $10 replacing the fill valve seal diaphragm takes about 5 minutes and the entire valve up to 45 minutes since you need to drain the tank and remove some of the connector fittings holding the line onto the end of the valve plus a retaining nut at the base of the valve. There are two types of these plastic Fluid Master valves, and one has the rubber diaphragm captive inside the cap of the fill valve, but the other has the rubber diaphragm in the base of the unit. It is accessible through the tank, but you need to twist off the entire fill valve gently. With water pressure off turn the entire stem and float assembly counterclockwise about 40 degrees. So to start this job, you need to decide if you are going to repair or replace the fill valve. Repairing is the cheaper and faster way to go on most toilets with a fluid master style fill valve. There are a few that look and work the same way. Once you decide, then you need to first close the water valve into the fill valve at the base of the tube that connects the water pipe to the fill valve. The valve is usually located at the wall or floor under the bottom edge of the tank. Rotating this valve clockwise will close off water pressure to this fill valve. These are not used very often, and they can be very stiff the first time you use them in a while they may also drip a little so place a towel nearby to catch any water drops. Now relieve the pressure from the pipe by flushing the toilet, note that the fill valve will drop to the bottom of its stroke and no water should be filling the tank. Next, you need to twist the top off of the fill valve by grabbing the lever arm near the center of the cap and turning it about 30 or 40 degrees counterclockwise. There are two small plastic locking tabs that you can press against using your thumbs. This assembly is fragile, so please do not force it, and do not turn by just holding onto the lever arm. Once you have, it turned a little to the left this cap assembly should lift straight up revealing a small rubber disc about the size of a silver dollar. This black piece is what you should have brought home from the store. If you are doing it in reverse, then take the old rubber out and head to your favorite hardware store with the old part and find yourself the fill valve seal number 242. Inserting the new one is simple, but you must make sure it is right side up. There is a small silver guide stem inside the cap piece, and the flat part of the diaphragm rests against the inside part of this cap. To make sure look under the cap and see that there is a short nib in the center of the rubber that will face down into the tube when you insert the cap. The diaphragm will only fit properly the one way so if something seems right or wrong do not force it, stop and flip the diaphragm over and try again. Typically no lubricant is necessary on this diaphragm. Now that the valve is back together it is time to gently and slowly open the water valve and test the fill-up cycle of your toilet. This fill can take two to five minutes on a typical water system. You should stand by in case anything goes wrong, and make sure the toilet flushes and refills at least two times to verify correct operation. And that is all it takes really! You will probably spend more time reading this and going to the store than it will take you to do the job!  Those storage peg boards can run hundreds of dollars especially once you figure in the cost of all the different little compartments to hold the tools in. If you have a lot of hand tools such as screwdrivers, pliers and garden tools that need their proper place in the garage, then you can create this tool storage area in about half an hour and begin hanging your tools so that they are easy to find. This chicken wire tool storage area is very inexpensive to make and works great for hanging all sorts of tools so that you can see them easily and grab what you need in a hurry.
Chicken Wire Tool Storage Area: Materials: 4 foot by 4-foot piece of chicken wire about 16 feet of 2x4 (at least 4-foot pieces) 4 foot by 4-foot piece of plywood staple gun nails Chicken Wire Tool Storage Area: Step One: Begin by creating a panel of plywood that is 4 foot by 4 foot to create the surface of your chicken wire tool storage area. Then place the chicken wire on the plywood and use the staple gun to staple every 4 inches of the outer edges of the chicken wire to the plywood. This will keep the wire in place and sturdy. Chicken Wire Tool Storage Area: Step Two: Now, create a frame for the tool storage area by cutting a two by 4 into half so that you have a 1x2 board that is at least 4 feet long. Build a frame for the tools storage area by cutting angles into the 1x2 to create a picture frame type look. Chicken Wire Tool Storage Area: Step Three: Nail or screw the frame to the plywood over the top of the outer edges of the chicken wire. You will need at least one nail or screw every 2 inches for optimal security and sturdiness. If you are placing extremely heavy tools on the board, then you may wish to use one screw or nail every inch. Chicken Wire Tool Storage Area: Step Four: Use hangers to hang the tool storage area onto the wall in your garage or any area in which you need to store your tools. Make sure that you use the proper hanging items to hang the tool storage such as tapcon screws in concrete garage walls or anchor screws in drywall so that the storage area is sturdy and safe. |
